Onions and More Onions

 Turns out 50 pounds of onions will probably only last through January

I bought 50 pounds of unsorted onions from Elmer Farm, my CSA farmers this fall.  I figured unsorted meant that the onions varied in size, but I didn’t know that they would also vary in likelihood of storing well.

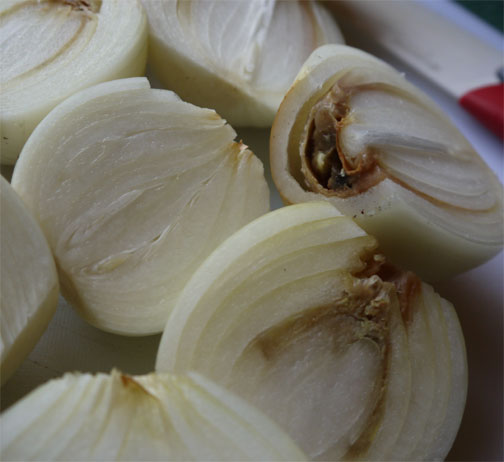
Some of the onions didn't cure properly. 

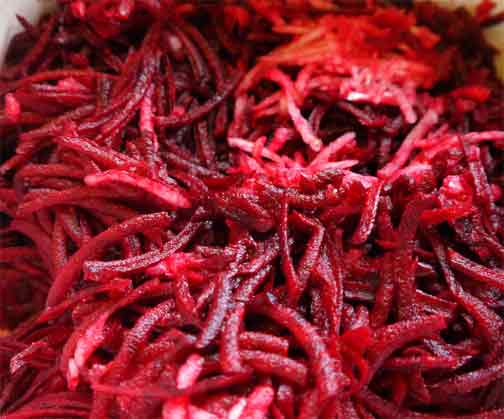
Some of the onions had soft necks where the leaves had not fully dried.  Each layer of an onion is actually a leaf, and some leaves dry better than others—no matter how well they are handled post harvest.  So before storing, I had to sort the onions, setting aside those with thick and/or soft necks for using immediately. Turns out, about 15 pounds were destined to be used quickly.  Any by using quickly, I mean, discarding any slimy brown layers, but utilizing the rest of the onion.

 I could feel the onions with soft necks, alerting me to the fact they wouldn't store well.

You’d think that would be a daunting situation, but it wasn’t.  First, 6 pounds or so went into making Rosemary Onion Confit (see March Madness 2012).  Some went into the dehydrator, some went into a beef and onion stir-fry with black bean sauce, some went into onion soup.  And the rest were fried—not something I recommend doing but often, what a wonderful once-a-year treat!


About the stir-fry, I followed my basic recipe for a stir-fry (see Serving Up the Harvest, pages 35-35), using beef and 8 cups of slivered onions, substituting black bean sauce and 1 tablespoon chopped fermented black beans for the oyster sauce, and omitting the broth and cornstarch.  When I returned the stir-fried beef to the wok with the seared onions, I added 6 sliced scallions.  The only trick with an onion-based stir-fry is to use a really, really hot wok and get a good sear on the onions.

 Beef and Onion Stir-Fry with Black Bean Sauce

For the onion soup, trust me, you don’t need a recipe.  Also, you don’t need to serve it with a cheese layer on top—you can melt cheese on toast under the broiler and then ladle the soup on top.  It is much easier to eat that way.  To make onion soup, just slice several pounds of onions; you’ll want 8 to 12 cups of sliced onions.  Then pour beef broth on top—could be homemade from roasted soup bones, could be from bouillon, or canned—using enough to cover the onions, 8 to 12 cups, and simmer for about 30 minutes.  Season with soy sauce, which has that umami quality and darkens the color of the broth nicely, and pepper.

 Ladling onion soup onto cheese toasts.

And finally, the fried onion rings.  I went for a simple seasoned flour for a coating, dipping the onions first in buttermilk, then in flour, then into the hot onion in batches until browned.  They turned out great—crunchy, sweet, salty—and maybe just a little too good.  So as with all good seasonal foods, enjoy fried onions as a celebration of the harvest, and don’t worry if your onions haven’t cured as well as you would have liked.
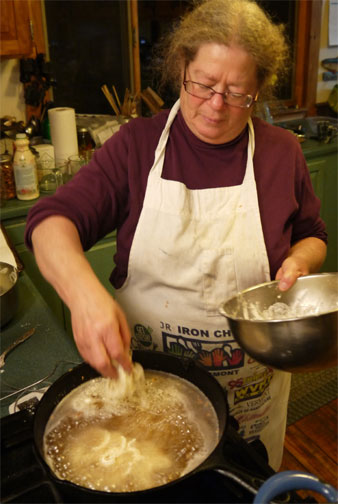
 Deep frying onions.

Oh, and where are all those onions stored?  In an unheated upstairs closet.  I don’t know what people do who have heat in the upstairs bedrooms. An unheated closet is the perfect place to store onions. How do they store their onions?  How do they sleep?

Winter Salads

One of the pleasures of my life is feeding the bands that come to play at the Ripton Community Coffee House every month.  After the sound check, I send dinner over to the community house to feed the coffeehouse crew, and the band comes over to my house to have dinner and relax before their set begins.


I always point with pride to the photograph on the wall of Robert Frost enjoying tea with Agnes and Eunice Billings.  The Billings sisters used to own this old farmhouse where Frost took his meals while living across the road and teaching at the Breadloaf Campus.  The photograph means that the band is being served in the Robert Frost Memorial Dining Room.

Robert Frost in my dining room!
What to serve the band is always a dilemma. It has to be made in quantity to feed both crew and band.  It has to be transportable and tasty even if sound check runs long or the band gets lost.  There is always at least one vegetarian in the group.  There is always at least one singer who would prefer not to eat dairy before a performance.  Vegans?  Of course.  And wheat free, gluten free, soy free.  It is a dilemma okay, but hey, that’s expected with modern diets, isn’t it?

This past Saturday, Laura Cortese played with a back-up band.  All in all, the band included 3 fiddle players, a cellist, a sound man, and a merch person.  And all diet preferences and limitations were represented.  What to make?

I quickly decided on a trio of salads—carrots, because of the abundance of carrots in the root cellar (see previous entry), wild rice salad with roasted vegetables, and lentil salad made with a jar of my Rosemary-Onion Confit (see March 29, 2012, March Market Madness).  

Carrot Salad with Lime Dressing

The carrot salad is one I’ve been playing with lately, and I don’t have the recipe firmed up.  It is simply grated carrots, chopped scallions, minced cilantro, olive oil, lime juice, a touch of sugar, and salt and pepper.  It is done when the carrots, cilantro, scallions, lime juice, and olive oil are in perfect balance, and you can taste each one. Make it yourself.

wild rice salad with roasted vegetables
The wild rice salad?  Easy as can be.  Cook up some wild rice.  Roast up some root vegetables and/or winter squash and an onion.  Make a dressing with olive oil, cranberry sauce, and sherry vinegar.  Toss with roasted almonds and dried cranberries.  How seasonal can you be?

lentil salad
The lentil salad is made with French green lentils—lentiles du Puy—because they hold their shape so well.  Add something crunchy (usually I add carrots, but that seemed redundant, and besides I had celery leftover from Thanksgiving).  Then dress with a jar of Rosemary Onion Confit and a touch more apple cide vinegar.  

Do you really need recipes for dishes this simple? 

Love Your Roots!

My son took over a large part of my vegetable garden this year.  The plan was that he would grow storage crops, while I got to experience life as a CSA member.  Both experiences were great.

But now we are flooded with roots.  There are sixty pounds of carrots chilling in my extra refrigerator (The basement steps where I’ll store my root vegetables is not cold enough yet.).  I have onions, potatoes, beets, and Gilfeather turnips – some farm-bought, some homegrown.  

The carrots are weighing heavily on my mind right now.  I usually use up about one pound a week.  The sixty pounds he harvested?  More than we need.  My son thinks I should make carrot soup more often.  I’ll be roasting them for sure, adding them to soups, grating them into salads, and even pickling some of them them.  Turns out the rest of the family really loves cooked carrots (though not met) and would be happy to have them show up more frequently at the dinner table.

Sixty pounds of carrots


But back to the carrots. I wasn’t aware of the varieties, or I would have plundered the Little Fingers and Tonda di Parigi earlier this summer when they were at their optimal sizes.  You see, my son swapped seeds with friends and didn’t tell me he was chosing to grow some of the carrot varieties past optimum size because he couldn’t figure out how he would store them. In any case, here’s what I know about the carrots he grew:

Little Finger.  Developed in France for canning and pickling.  Nice orange color; should have been harvested when about 3 inches long.  

Tonda di Parigi Carrot. A 19th-century Parisian heirloom, deep orange, best harvested young, creamy and sweet when cooked.  

Kuroda.  An 8-inch long, deep orange, carrot with a blunt tip. Supposedly very good for juicing. 


This one is a monster.

Danvers 126 Half Long Carrot.  The Danvers variety dates back to the 1870s, and this strain was developed in the 1940s.  It’s an American classic. 

Red Core Chatenay.  No red core at all, but a standard, classic 5- to 7-inch carrot with smooth sides that taper to a blunt tip. 

Atomic Red Carrot.  It’s beauty is only skin deep, but the carrot is theoretically very high in lycopene, which has been shown in studies to help prevent several types of cancer. 

Scarlet Keeper Carrot.  A lovely orange carrot that is supposed to store very well. 

Napoli Hybrid. An extra-sweet carrot with a fine texture. 

As my son harvested the carrots, he carefully separated them in trays, casually rinsed them with water from the hose, and refrigerated as many as he could.  The remainder went onto the too-warm basement stairs.  I thought the dirt that was clinging to them was sucking out moisture.  So I washed them and bagged them, and in so doing, destroyed his classification system, and now we aren’t sure which carrots are which. 

Last night I was cooking some Chinese dishes, so I made a carrot pickle to go with it all.  I usually make this pickle with a mixture of carrots and daikon radish, but our daikon radishes all went into the compost pile.  These daikon grew to enormous size, bolted in the heat, and developed all the sharp, sulfurous flavors of a turnip and none of the sweetness that would balance it. No problem, though; carrots only work just fine.


Chinese Spicy-Sweet Pickled Carrots.

Chinese Spicy-Sweet Pickled Carrots
Makes about 1 quart 
1 pound carrots, cut into matchsticks2 teaspoons salt1 cup water½ cup sugar1/3 cup mirin1/3 cup rice vinegar¼ cup distilled white vinegar6 thin slices fresh ginger 1 clove garlic, sliced1 dried red chile

1. Combine the carrot with the salt in a bowl and mix well.  Cover with ice water and let sit for at least 2 hours, up to 6 hours.

2.  Combine the water and sugar in a small saucepan and heat, stirring, until the sugar completely dissolves. Remove from the heat and stir in the mirin, rice vinegar, white vinegar, ginger, garlic, and chile. Let cool to room temperature.

3. Drain the carrots and pack into a clean pint jar. Strain the brine, discarding the ginger and garlic and pour in.  Add the dried chile, if desired. Seal.  Best flavor will develop if you can allow it to cure for at least 1 week before eating.  

Adapted from The Pickled Pantry.©2012 Andrea Chesman.  All rights reserved.

On the Road with Pickles

I’ve been taking my pickle show on the road ever since the Pickled Pantry hit the bookstores in June.  I’ve visited bookstores, taught cooking classes, and performed demos at festivals. 


 Part of my show on the road. These are Dill Chips

People who want to promote their cookbooks must bring samples with them of foods to taste.  (One envies the novelists who simply have to read from their works.)  But bring pickles I do.  For most of the summer I have brought my No-Fail Half-Sour Pickles (see post, June 8), not the least because it is a no-fail recipe.  It also makes a darn fine pickle.  But now that it is fall my attention turns to recipes utilizing cabbages, carrots, and daikon radish.

When I take my show on the road, I find myself explaining why I wrote another book on making pickles when my 1983 book, Pickles and Relishes, still sells well and contains some very fine recipes.  (Hopefully, I recycled all the good ones in the new book—or at least all the favorites).  Pickles haven’t changed over the years, but our interest in pickles have. For every pickler who just wants recipes to deal with garden excess, there are picklers who are interested in exploring traditional ways vegetables and fruits are pickled in other cuisines.  


On a pickle trip to Montreal's Chinatown, I loaded up my cart with mysterious looking pickled vegetables—all research for The Pickled Pantry


Curtido is my favorite pickle of the moment.  It is called the Salvadoran version of sauerkraut but the flavor profile is so different that calling it “sauerkraut” does not do it justice. Curtido is a lightly fermented cabbage and flavored with onion and oregano.  It is the traditional Salvadoran accompaniment to pupusas, which are cheese- or meat-stuffed pancakes made from masa harina (the same dough from which torillas and tamales are made).  Not surprisingly, curtido makes a great topping for fish tacos – it also makes a wonderful salad.


A bowl of Curtido

Curtido
Makes 1 1/2 to 2 quarts

2 pounds green cabbage (1 small to medium head), cored and grated or thinly sliced 

2 carrots, grated

1 onion, thinly sliced

2 fresh red or green jalapeños, seeded and finely chopped

2 teaspoons pickling or fine salt

2 teaspoons dried oregano (preferably Mexican)

Optional Brine

1 teaspoon pickling or fine sea salt

1 cup water

1. Combine the cabbage, carrots, onion, and jalapeños in a large bowl. Add the salt and mix well.  Let stand for 30 minutes.

2. Using a potato masher or your fists, pound and press the vegetables until they release their liquid and are quite wet. Add the oregano and toss to distribute. Pack the mixture tightly into one or two clean quart canning jars or crocks, tamping down on the vegetables with a wooden dowel or your fingertips with as much force as you can until the level of liquid rises above the vegetables. 

3. If the vegetables do not make enough liquid to cover the vegetables, add the optional brine.  To make the brine, combine the salt and water.  Heat until the salt dissolves.  Let cool to room temperature before adding to the jar; you should not need more than a couple of tablespoons, but it depends on the surface area of your container.

4. Weight the vegetables to keep them submerged. Cover the jar to exclude air. Set the jar where the temperature remains constant; 65° to 75°F is ideal. Let ferment for 2 to 3 days.  Taste; when pleasingly sour, refrigerate.

Tomatoes!

Our tomato crop is abundant.  While others around us have had diminished yields due to blight and drought, our garden has never been better.  And it has never been better tended.  My son dug new beds this year, added plenty of compost and manure, and tested and balanced the soil nutrients and pH.  He watered faithfully til the plants started to fruit.  It all paid off.

Tomatoes!


A few of the rosy-blushed, yellow pineapple tomatoes have weighed in at more than two pounds. And are virtually seedless.  What an amazing tomato!  

We have Black Cherries, Red Currant Tomatoes, Sungolds, and Super-Sweet One-Hundreds.  We have Yellow Taxies and Purple Cherokees, Indigo Rose, Nyagous, Roma, Black Crim, and Amish Paste.  And we have plenty of Anaheim chiles.  Obviously, it is time to make salsa.

And more salsa.

Chipotle Salsa

But back to those tomatoes: Here’s a partial report.

As always, the cherries were earliest and continue to produce.  The Black Cherries have a very interesting, very rich flavor – very umami one might say. They are big – a two-bite cherry. Sungolds and Super-Sweet Hundreds – classic, super-sweet, great snacking tomatoes, very prolific. Red Currants –  need to be fully ripe for full flavor, really pretty in some salads, but just not worth the labor to harvest, though amazingly prolific.

Yellow taxi was early.  That is the strongest praise I can give this otherwise low-acid, low-flavor tomato. 

Can’t tell the Amish Paste from the Romas.  A paste is a paste is a paste – but always good, especially for cooking and canning.

The Nyagous, another “black tomato” also has that umami, that mysterious rich flavor.  The Indigo Rose tomato did not win my heart.  It is fully black when unripe, then goes to green, then red.  It spends too much effort on changing color, not enough on developing flavor.  We won’t plant it again.

There comes a point in the tomato harvest when we are doing less tasting and comparing varieties and more thinking about how and when to preserve.  That’s where I am right now.  Since I am doing a lot of demos and classes on making pickles, mostly I am throwing the tomatoes into bags and freezing – to be cooked into salsas and sauces when I have the time.

Here’s a favorite canned salsa recipe.  It’s from The Pickled Pantry, and I’ll be taking it to some of my tastings and demos.  It has been a house favorite for years!  I made more today.


Salsa and chips

Chipotle SalsaMakes 4 to 6 pints
Chipotle chiles (smoke-dried jalapenos) add a lick of fire to this otherwise simple salsa.

24 cups quartered ripe tomatoes8 garlic cloves, peeled and left whole2 to 4 chipotle chiles2 cups distilled white vinegar2 onions, finely minced1 cup finely minced fresh green chiles1 cup finely minced sweet bell pepperSalt

1.  Combine the tomatoes, white vinegar, and chipotles in a large saucepan and bring to a boil.  Reduce the heat and simmer until the tomatoes are very soft, stirring occasionally, about 45 minutes.

2.  Process the tomato mixture through a food mill, discarding the seeds and skins.

3.  Return the strained mixture to the saucepan and add the onions, fresh chiles, and bell pepper.  Boil gently until the salsa has reduced to a nice thick sauce, 1 to 2 hours.  Season to taste with salt.

4.  Ladle the hot salsa into clean hot pint jars, leaving 1/2-inch headspace.  Remove any air bubbles and seal.  

5. Process in a boiling water bath for 15 minutes, according to the directions for canning on page 000.  Let cool undisturbed for 12 hours.  Store in a cool dry place.

Kitchen Notes
* For a milder salsa, remove the seeds of the chipotle and fresh chiles before adding to the salsa. 
* Your yield will vary depending on the juiciness of the tomatoes.  Plum tomatoes tend to yield more than salad tomatoes because they have a higher flesh to juice ratio.
Recipe adapted from The Pickled Pantry by Andrea Chesman.  ©2012 Andrea Chesman.  All rights reserved. 

Dinner in Minutes

Chard and Raviol 

Life is busy.  Then it gets busier.  Tomatoes need canning, onions and carrots need harvesting, kids need lots of attention as they head back to school, summer has taken a toll on the cleanliness of the house, warmer clothes need digging out.  Then there is your usual busy life.  It adds up.


How perfect then, to have a healthy, veggie-rich dinner that every will enjoy.  This is one of my favorite dishes to make when time is short.  In the spring, substitute arugula or spinach for the chard; in the winter substitute kale or cabbage – and adjust times accordingly.  For as long as the harvest lasts, we are all happy to eat lots of Swiss chard.

 The garden keeps producing more chard.

A drizzle of a reduction of balsamic vinegar – balsamic vinegar and a little sugar cooked down until syrupy – makes elevates the dish to make it a dinner for special occasions.


Chard and Ravioli

Serves 4


A magic formula: Take two big bunches of chard from the garden. Combine with pantry and freezer staples. The result—so much greater than the sum of its parts—is an incredibly delicious, healthful one-dish vegetarian meal. It doesn’t get much better or much easier than this. This is a family favorite. Chard is one vegetable that everyone agrees goes well with pasta.

 Swiss chard ready for cooking

2 pounds (12–16 stems with leaves) red, green, or rainbow chard, leaves cut into 1-inch ribbons and stems diced

2 tablespoons extra-virgin olive oil

2 cloves garlic, minced

1 shallot, minced

Pinch of crushed red pepper

Salt and freshly ground black pepper

1 package (30 ounces) frozen cheese-filled ravioli

½ cup freshly grated Parmesan 


1. Bring a large pot of salted water to a boil. Add the chard stems and boil for 2 minutes. Add the leaves and continue to boil until just wilted, about 30 seconds. Remove from the pot with a slotted spoon and drain in a colander.


2. Bring the water back to a boil.


3. Meanwhile, heat the oil in a large skillet over medium-high heat. Add the garlic, shallot, and red pepper and sauté until fragrant, about 1 minute. Add the chard and continue to sauté until heated through, about 3 minutes. Season with salt and pepper. Keep warm.   


4. Add the ravioli to the boiling water and simmer (do not boil) until the ravioli are all cooked through and rise to the surface of the water, about 5 minutes. Drain well.


5. In a large serving bowl or platter, combine the ravioli and chard and toss together. Sprinkle with half the Parmesan and toss again. Sprinkle the remaining Parmesan on top and serve.


Recipe from Serving Up the Harvest by Andrea Chesman.  ©2005, 2007 Andrea Chesman.  All rights reserved. 

Swiss Chard: A Garden Stalwart

Swiss chard is a garden stalwart.  It likes water but takes a good measure of neglect.  It is slow to bolt and reasonably fast to grow. You can harvest only the outer leaves and then enjoy a long season of chard eating, even past the first couple of light frosts.  And with the rainbow chard variety, it is a beauty.  Actually, I think it is beautiful whether the stems be rainbowed, white, or red.
Chard’s botanical name is Beta vulgaris ssp cicla, showing its close relationship with beets (Beta vulgaris).  It’s numerous other names are leaf beet, silverbeet, white beet, spinach beet, strawberry spinach, seakale, Sicilian beet, Chilean beet, and Roman kale.  Since it has been cultivated at least since the hanging gardens of Babylon, it has had time to spread around and acquire regional names.  But by any name, it is a terrific vegetable.
Like any green, Swiss chard will wilt quickly and can be lightly cooked.  But I think chard really comes into its own when baked or braised until the texture is silky and its full flavor has been coaxed out.
I recently notice that when people flip through my book, Serving up the Harvest, they often comment on a recipe for Braised Chard Pizza.  Since the weather is a little cooler up here in Vermont, I risked turning on the oven recently for this tasty pizza.
Braised Chard Pizza 
Serves 6
Garlic-scented ricotta cheese makes a bed for silken Swiss chard in this lovely green-and-white pizza.
Dough for two 10-inch pizzas
2 pounds (12–16 stems with leaves) ruby, green, or rainbow chard, leaves cut into 1-inch ribbons and stems diced
1/3 cup extra virgin olive oil 
1/4 cup water
1 onion, diced
Salt and freshly ground black pepper
3 garlic cloves, minced
1 tablespoon fresh oregano leaves or 1 teaspoon dried
1 pound ricotta cheese
1 cup freshly grated Parmesan cheese
1. Prepare the pizza dough and set aside in a warm, draft-free place to rise until doubled in bulk, about 1 hour.
2. Meanwhile, braise the chard.  Combine the Swiss chard, oil, water, and onion in a large Dutch oven or large, wide saucepan.  Season with salt and pepper.  Cover and cook over medium heat until the chard is completely tender, 30 to 45 minutes.  Drain well (but reserve the cooking liquid for flavoring stocks or soups or cooking grains).
3. Preheat the oven to 500° F.  
4. Stir the garlic and oregano into the ricotta and season to taste with salt and pepper.  
5. Lightly oil two 10-inch or 12-inch round pizza pan or two 12-inch by 15-inch baking pans. Divide the dough in half.  Stretch each piece of dough to fit a prepared pan. Spread the half the ricotta over each pizza crust. Spoon the chard on top of the ricotta.  Top the pizza with the Parmesan.  
6. Bake the pizzas for 12 to 15 minutes, until the crust is golden and the Parmesan is melted.  
7.  Slice and serve warm. 
Adapted from Serving up the Harvest by Andrea Chesman.  @2005. 2007.  All rights reserved.

Gratitude for Garlic

Of all the vegetables that I plant, of all that I tend, of all that I harvest, of all that I cook, I am most grateful for garlic.Garlic in basket. Photo by Lauren Slayton

As a garden crop, garlic is a prize-winner.  It is planted in late October, when most of the other garden chores are over.  There is time – time to work the bed, time to mulch before the weeds threaten, time to put away clean the garden tools and put them away for the winter.  Time to rock back on my heels and appreciate how rewarding the garden can be.

Then, if I’m lucky, the snow comes and buries the garlic for months.  The garlic is safe, and I am done with it. Come spring, garlic will sprout up first—a significant part of the garden all set for the growing season.

This year, like most, the garlic harvest came after the peas and spring greens were spent and before the green beans were really coming on.  I’ve been stealing a bulb here and there for cooking, but not worrying about the garlic at all. 

You have a much wider window of opportunity for harvesting garlic than most plants.  Yes, if you wait too long, it could rot in the ground, or at least the outer skins could rot away, leaving the bare, unprotected cloves.  But generally you can wait for a nice sunny day for the garlic harvest.  

Just harvested garlic left to dry

Of course, I am grateful for the flavor garlic brings to food.  Neither Italian nor Chinese foods would tantalize like they do without garlic.  Without garlic, there would be no Jewish half sour pickles, no French aïoli (garlic mayonnaise), no Italian spaghetti aglio e olio (pasta with garlic and oil), no Spanish gambas al ajillo (garlic shrimp), nor Greek skordalia (a dip of potatoes and garlic).

Finally, I am grateful for any reason to cool myself in the river where I wash my bulbs.  I sit in the river, rub the dirt from the bulbs, and plunk them into a-five gallon bucket.  And then I think to myself, work doesn’t get any better than this.
The river where I wash my garlic

Marcella Hazan has a perfect recipe for spaghetti with garlic and oil, with a variation that includes tomatoes.  

Spaghetti with garlic, oil, and tomatoesI followed her version fairly faithfully, using 1 pound of vermicelli, ½ cup good extra virgin olive oil, and 4 cloves garlic.  A little basil to garnish, salt and pepper.

Yellow Taxi tomato, black Nyagous tomatoes, and Romas, with garlic and basil First the oil goes in the bowl, then the garlic, then the tomatoes. Add the hot pasta and toss. Garnish with basil. Simple.

 That’s it.  I doubled the tomatoes, however, and didn’t bother to peel and seed them.  It is summer, after all.  Who has time to peel tomatoes?  The river calls.

CSA Anxiety Disorder

My friend Joanna suffers from a new psychiatric disorder.  It hasn’t yet appeared in the psychiatric bible, the DSM, but as soon as she started talked about it, I knew I suffered from it also.

It's not pretty. On top of CSA anxiety disorder, I suffer from refrigerator management deficit disorder
The disorder is CSA anxiety disorder (or CSAAD, as I call it), and its symptoms appear cyclically.  Like the day before a CSA pick up.  The anxiety centers around the refrigerator, which is often filled with vegetables, vegetables from the CSA that haven’t been prepared and consumed by the time the next CSA pickup rolls around.  

The anxiety can be heightened by guilt, especially if you are prone to guilt due to a certain religious or ethnic background (you know who you are).  

In the New York Times on Wednesday, July 18, Julia Moskin wrote about vegetable anxiety, which apparently goes beyond CSA members and extends into the general farmers’ market shopping population.   She writes that even though everybody knows they should be eating more vegetables, and many are buying gorgeous fresh vegetables from the market, meal planning still centers around the meat, with vegetables as the afterthought.

Obviously, you need to reverse that kind of thinking and start your meal planning around the vegetables.  

A CSA share

Joanna has found that a huge stir-fry of greens does much to decrease the anxiety.  And it will, a big bag of greens cooks down to almost nothing.  Season with soy sauce and garlic, and serve it over rice with some tofu.  Even better, master a few stir-fry sauces and your family will never again ask for Chinese take-out when your refrigerator has all you need.  Or cook up some Italian sausage, sauté a mound of vegetables, and serve it over pasta, with a sprinkling of Parmesan cheese.  (If you cut all the vegetables to the same size and sauté or stir-fry the vegetables one type at time, you will get better results.)

When I wrote Serving Up the Harvest, I included several “master recipes” that can be made with whatever vegetables you have on hand.  You can make quiches, crepes, stir-fries, lo mein, vegetable soups, and sautés by following the basic recipe and using whatever vegetables you have on hand.  The recipe  below is one of my favorites.    

It is far, far better to start cooking with more vegetables than to give up your CSA. After all, where would you get your beautiful flowers?

The best part of my week is picking my bouquet.

Sautéed Vegetable Medley with Fresh HerbsServes 4
A side dish of sautéed vegetables, much like restaurants serve, is welcome with almost every meal.  The trick is to blanch the vegetables first, then finish in the sauté pan.  The vegetables are most attractive when they are all cut to the same size and shape. All of the vegetables are optional – use whatever combination of vegetables you have on hand.

1 medium zucchini or other summer squash, julienned  (optional)2 teaspoons salt (optional)2 tablespoons extra virgin olive oil1 shallot or 2 garlic cloves, minced1 green, red, or yellow bell pepper or 1 small fennel bulb, cut into strips (optional)1 cup green shelled peas, snap peas, snow peas, or corn kernels (optional)1-2 cups blanched julienned asparagus, broccoli stems, carrots, celery root, snap beans (optional)Salt and freshly ground black pepper2 tablespoons finely chopped or torn fresh herbs (basil, mint, oregano, rosemary, sage, summer savory, tarragon, thyme)

1.  If you are using zucchini or summer squash, toss with the salt in a colander and set aside to drain for 30 minutes.  Wrap in a clean kitchen towel and squeeze dry.
2.  Heat the oil in a large skillet over medium-high heat.  Add the shallot or garlic and sauté until fragrant and very slightly colored, about 1 minute. 
3.  Add any uncooked vegetables (bell pepper, fennel, peas, snap peas, snow peas, and/or corn) and sauté until slightly softened, 1 to 2 minutes.  Add the remaining blanched vegetables (asparagus, broccoli, cauliflower, carrots, celery root, and/or snap beans) and continue to sauté until heated through, 2 to 3 minutes.  
4. Season generously with salt and pepper.  Sprinkle with the herbs.  Sauté for 1 minute longer.  Serve hot.

Taste-Testing Chickens

My son and I are gearing up to raise chickens for meat. The other day, Sam came home with two live birds,Red Ranger hen to practice harvesting, to see if dry plucking yielded better skin, and to get a sense of whether there is a difference in flavor among breeds.  


Cornish Cross hen
The hens he brought home were an 8-week-old Cornish Cross and an 8-week-old Red Ranger.  The Cornish Cross is a white feathered, big-breasted lady and the standard commercial broiler breed.  This hen dressed out at 4.1 pounds.  The Red Ranger, a French hybrid created in the 1960s is a slower-growing breed, known for its flavor.  This bird was a scrawny 3.6 pounds, with a long, narrow breast.  The dark meat of this bird is proportionate to the white meat.  In my family, dark meat is always favored over white meat.  

Meanwhile, back in the kitchen...
While I was roasting the two birds side-by-side to detect whether there was going to be a flavor difference, Sam returned to his friend’s place, where he helped to harvest the remaining 40 odd birds.  Besides being significantly bigger, Sam reported, the Cornish Crosses proved easier to pluck because they had far fewer feathers.  And, the Cornish Cross were bigger in part due to their aggression at the feeder, which meant they ate more.  They also yielded more fat.  Once in the vacuum-sealed bags, they looked more like supermarket chickens.

Meanwhile, back in the kitchen, I set my two birds on racks in a roasting pan, breast side down, and roasted them at 500°F for 20 minutes. Then I turned them over for another 10 minutes at 500°F.  By then the skin was golden and the drippings were beginning to smoke. I decreased the heat to 325°F, added a little water to the pan to decrease the smoking, and roasted until the meat in the thickest part of the thigh registered 165°F. The big bird took about 20 minutes longer than the smaller bird (which I removed from the oven and let sit under a tent of aluminum foil).

The problem with roast chicken—if you consider it a problem—is that it calls out for gravy and mashed potatoes.  Add a cooked vegetable (fresh spinach), and you are getting close to a Thanksgiving meal with lots of timing issues and lots and lots of dirty pans (and a failure to remember to photograph it).  You’ll have to take my word that was a fine dinner—and provided lots of leftovers.

The flavor?  The Red Ranger was the clear winner in the flavor department.  It may have looked scrawny, and the texture was definitely more stringy, but the flavor of the flesh was superior to the Cornish Cross and to any supermarket bird I’ve ever had.  The dark meat tasted almost like turkey, and the white meat was juicy and delicious.  The Cornish Cross lost out only in comparison.  It was certainly more tender and and perhaps more juicy.  On its own, we would have been mighty pleased. (I have to add that the Cornish Cross leftovers were juicier and much more tender.)

Roast chicken!

Where will we go from here?  Probably to a breed we haven’t eaten before.  The experiment continues.  Please stay tuned.

Zucchini Season is Here!

At first the summer squash trickle in.  A nice 6-inch zucchini here, a 3-inch pattypan there.  Then all of a sudden, a monster.  Such is the way of the summer squash.

The squash is bigger than my 12-inch chef's knife.
At my CSA pickup this week, we were entitled to six items in the summer squash/cucumber bin.  There were squash of several varieties:  zucchini (of course) in both yellow and gold colors and long and round shapes, a light-skinned Mid-East type, some yellow squash (both straight-neck and crooked), Pattypan (look like flying saucers), and Zephyr (yellow with light green ends).  I went straight for the golden and green straight zucchini, because they are the most versatile, lending themselves to easy slicing, julienning, and cutting into spheres. I skip the round zucchini since they are only good for stuffing, while the straight zucchini can work fine for stuffing and everything else.  Another time I’ll try the Mid-eastern type to see if the flavor varies.  

You’d think with the season just beginning, there wouldn’t be any overgrown summer squash, but, of course, there were a few.  Even at a farm, where the gardening is anything but haphazard and careless, those pesky squash can get out of control easily.  One rainstorm and there you have it: a monster.  It doesn’t help that a healthy plant is big and leafy, fully capable of playing hide and seek, til the squash is overgrown.  The plant just wants to produce seeds. 

Naturally, there was unlimited access to the overgrown squash.  You’d think that after years of growing my own zucchini baseball bats, I’d have had enough.  But no, I happen to have a full repertoire of recipes that deal with overgrown zucchini, and I was hankering to make the Zucchini Cheese Squares that I made for Serving Up the Harvest.

The squash I used was an overgrown Zephyr, so the dish lacked the green flecks that usually dominate the color.  The eggs I used were free-range guinea fowl eggs, so the color is a bit more golden than usual.  Also, for the cheddar, I substituted a mix of Grafton cheddar, Crawford Farm’s Vermont Ayr, and provolone cheese – what I had on hand.

The Zucchini Cheese Squares is ready for the oven.

While happily applying themselves to dinner, my family commented that the title doesn’t do the dish justice.  They got no argument from me—but no one came up with a better name.  The dish could be called a spoonbread, but most spoonbreads are made with cornmeal and the texture is usually softer.  The flour and baking powder rule it out of the frittata category.  The eggs aren’t separated, so it isn’t a soufflé.  We pondered the problem until it disappeared.  

Literally.  Not a crumb was left.  Let me know if you come up with a better name.

Dinner was Zucchini Cheese Squares, green salad dressed with Ripton House Dressing (see below), plus pickled golden beets, and cantaloupe. If the beets had been purple, the colors of dinner would have been perfect.

Zucchini Cheese Squares

Serves 6 to 8 

Zucchini Cheese Squares

My kids love these “zucchini pillows.”  The texture is softer than a bread and denser than a soufflé, with just the trace of crunch from the onions.  It makes a great side dish, especially on a picnic, where the squares can be eaten out of hand.  You can use overgrown zucchini here.
3 cups grated zucchini

2 teaspoons salt

2 cups grated cheddar cheese

1 onion, diced

1 1/2 cups all-purpose flour 

1 tablespoon baking powder

2 teaspoons fresh thyme leaves or 1/2 teaspoon dried

1 teaspoon freshly ground black pepper or lemon pepper

1/2 cup canola oil

3 large eggs, beaten

1.  Combine the zucchini and salt in a colander and toss to mix.  Set aside to drain for 30 minutes.  Squeeze out the excess water. 

2.  Preheat the oven to 350° F.  Butter a 7- by 11-inch or 9-inch round baking dish.

3.  In a medium bowl, stir together the flour and baking powder.  Add the zucchini, cheese, thyme, and pepper.  Mix well with a fork, breaking up any clumps of zucchini.  In a small bowl, whisk together the oil and eggs.  Pour into the zucchini mixture and mix well.  Spread evenly in the baking dish.

4.  Bake for about 35 minutes, until golden.

5.  Let cool on a wire rack for 5 minutes.  Cut into squares and serve warm or at room temperature.

Adapted from Serving Up the Harvest.  © 2007, 2009 Andrea Chesman.

Planning Around a CSA Pick-Up

CSA bouquetThe best part of my week?  Wandering down rows of flowers at Elmer Farm when I pick up my CSA share.  Flowers and herbs, cut as needed, are part of this CSA, and I really value it – especially on a dreary day like today.  My bouquet contains snapdragons, a stem of safflower (Carthamus), black-eye susan, amaranth, cleome, painted tongue (Salpiglossis), ageratum, and strawflowers.   


But let me not shortchange the beautiful veggies. I brought home enough mesclun salad mix for three salads, a head of frisee, one kohlrabi, a handful of purple-top turnips with their greens, a bunch of golden beets, two heads of red butter lettuce, and one fennel bulb.  Let the meal planning begin.


Still life with veggiesLast weeks’ tuna and white bean salad served on a bed of greens featured a shaved fennel bulb, and that was pretty wonderful.  I could repeat that, but maybe I’ll make a risotto with fennel and golden beets.  I’ll put the butter lettuce to use in Vietnamese spring rolls with shrimp, cellophane noodles and lots of fresh herbs.  The frisee will be wilted in bacon fat and used to bed down decadent supper of poached duck eggs and crisp bacon.

We love turnip greens and beet greens, so those will be lightly wilted and served one night or another.  That leaves only the turnips.


When I wrote Serving Up the Harvest 2007 I had not yet discovered the joys of turnips.  I found my way to turnips via roasting them and I expect I’ll roast the tunips and the kohlrabi.  Come to think of it, roasted beets, kohlrabi, and turnips on a bed of frisee, dressed with my Ripton House Dressing (see post June 22, 2012) would make a fine dinner.  Poached eggs – hen or duck – would not go amiss here.


So many choices.  So little time.


The Green, Green Month of June

The green month of June is all about salad in my book.  I have been harvesting a little from my own garden, and a lot from my CSA.  It’s salad for dinner almost every night—sometimes with a grilled steak on top, sometimes stuffed in a pita with falafel or hummus, sometimes served on the side.  


Last night salad greens made a bed for a simple, hot-weather tuna–white bean salad (1 can of tuna, two cans of cannellini beans, 1 can of artichoke hearts—all well drained—plus finely chopped garlic scapes—could have been scallions or onions—steamed asparagus—could have been green beans—and sliced Harukei turnips—could have been radishes or carrots).  I dressed the salad mixture with a good olive oil plus red wine vinegar, sea salt, and pepper.  A fine, easy meal for a hot night.  Bread and wine and a porch for catching the slight breeze made it a fine dinner.    

Tonight I’m bringing a salad to dinner at a friend’s house.  Because the greens are so lovely, so fresh, and so flavorful, I don’t want a lot of other ingredients to detract from them.  So all I will add are some sugar snap peas  (the season will end quickly, so they are added to almost everything while they last), a handful of chive blossoms, and a couple of leaves of fresh oregano and mint.

If I were dressing this at home, I might just drizzle in some extra virgin olive oil, splash in some sherry vinegar, and sprinkle with Maldon sea salt – that’s what I usually do.  But for tonight, I’ll shake up a dressing in a canning jar because it is easier to transport that way.  Then, I’ll dress it at the last minute before we eat.  

Salad greens this fresh should be dressed with a light, light hand.  

Ripton House Dressing
Makes about 1/3 cup

Balsamic vinegar with maple syrup has an almost smoky aftertaste.  The maple syrup acts as an emulsifier and holds the dressing together.
1 large garlic clove, minced1 ½ tablespoons balsamic vinegar1 ½ teaspoons pure maple syrup3/4 teaspoons soy sauce4 ½ tablespoons extra virgin olive oil

Combine all the ingredients in a half-pint canning jar and shake until well blended.


Or, you could go with a classic vinaigrette.

Classic Vinaigrette
Makes about 1/4 cup

A classic vinaigrette is made of oil and vinegar, bound together with a touch of mustard and flavored with a little garlic, shallot, or herbs.  The best quality extra virgin olive oil and the best-quality vinegar will make all the difference.  Which vinegar to use – red wine, white wine, sherry, herbal, raspberry, balsamic – depends on the salad you are dressing.  All work equally well with a salad of mixed greens.  This recipe is easily multiplied when a large quantity it desired, but for best flavor, make it up fresh each time you need it.  

1 tablespoon balsamic, herbal, raspberry red wine, sherry, or white wine vinegar

1 small garlic clove, minced, or 1 tablespoon minced fresh herbs or shallot

1/2 teaspoon Dijon mustard

3 tablespoons extra virgin olive oi

lSalt and freshly ground black pepper

Combine the vinegar, garlic, and mustard in a small bowl.  Whisk until smooth.  Slowly pour in the oil.  Whisk constantly until the oil is fully incorporated.  Season with salt and pepper.  Use immediately.

Adapted from Serving Up the Harvest.  ©2009 Andrea Chesman.  All rights reserved.

My First CSA Pick-Up

My first CSA pick-up today – a whole new level of food fun – and it beats shopping any day. 

I decided to join a CSA because I write about food, and I wanted to experience what it is like to come home with a big box of vegetables, not necessarily of my choosing.

Of course, what I picked up was put in my own canvas bags—no boxes.  And, I had a fair amount of choice among the offerings.  Still, since my usual meal planning begins with knowing what is ready to harvest from my own garden or making a list for buying at a store, the CSA share turns my head around.  I have to start with the veggies, then figure out the meals.  

Turns out, the vegetables immediately told me what I’d be cooking this week.

CSA still life
I knew that salad greens were pretty much inevitable this time of year, so I planned ahead and bought a steak to grill.  Sure enough, each share included a hefty helping of a beautiful mesclun mix. I dumped half of my bag in a big bowl.  Dinner was begun. 

I sliced half of a bunch of beautiful, white Harukei turnips into the salad as well.  (The remaining half was put away, with the greens bagged separately.  No question I will cook the greens; they are simply delicious.) Surprise!  There were zucchini in this week’s share, so those tasty morsels were quartered lengthwise, slicked with olive oil, and grilled after the steak, while the meat was resting.  Dinner was a lightly dressed salad topped with steak and grilled zucchini.  Perfect.

Tomorrow, I’ll be stir-frying those emerald Asian greens, along with the turnip greens – that’s a no brainer.  They are crying out for a swift swish through the wok, with garlic, chili paste, and soy.  The Boston lettuce I picked up (there was a choice of five items, including three different lettuces, the Asian greens, napa cabbage, and the turnips) will definitely be used as a wrap.  I am thinking I will stir-fry ground pork and finely chopped napa cabbage seasoned with Asian fish sauce, cilantro, garlic, and chiles.  The mixture will be wrapped in Boston lettuce and served with some Thai dipping sauces.  The dried black beans (another pleasant surprise) will be turned into a chili and served with salad.  There’s probably enough greens for salad throughout the week. 

This is going to be fun.  Here’s my house salad dressing; it’s a simple, balanced vinaigrette that doesn’t draw attention to itself. I figure I am going to be making this often.

Balsamic Maple Vinaigrette
Makes about ½ cup
1 garlic clove or small shallot, minced1 tablespoon high-quality balsamic vinegar1 teaspoon pure maple syrup½ teaspoon soy sauce3 tablespoons extra virgin olive oil
Combine all the ingredients in a half-pint canning jar.  Cover and shake to blend.  
©2012 Andrea Chesman

It's a Book!

The Pickled Pantry is here!  thumbnail imageAnd now my summer truly begins.  I am planning to take my show on the road and bring dilly happiness to folks at book stores, festivals, farmers’ markets, and cooking classes.


Over Memorial Day weekend I pickled a case (that’s 48 pounds) of pickling cucumbers into dill chips, bread and butters, and curry chips. I have 60 pint jars of pickles aging in a corner of my dining room.  Then I bought another 5 pounds of cukes and made a gallon of half-sours, which I hope to be ready by Sunday, June 8, when I take part in the Grand Opening of Phoenix Books in Burlington, Vermont.
60 jars of pickles plus a gallon of half-sours
People often ask how long it takes to write a cookbook like this, which has about 150 recipes.  The answer is usually, “All my adult life.”  If the book covers a subject I care passionately about – cooking vegetables, making pickles, preserving – then, truthfully, I’ve been at it since I left my mother’s house, a long, long time ago.  

Pickles got me started as a cookbook author.  As the newly anointed cookbook editor for Garden Way Publishing, which specialized in books about gardening and other self-sufficiency, homesteading skills, I was looking for someone to write a book about pickling.  When I couldn’t find anyone, I said to the publisher, “Heck, I could write it myself.”  That book was Pickles and Relishes: 150 Recipes from Apples to Zucchini, and it was publishing in 1983.  Then Garden Way morphed into Storey Publishing but I went freelance rather than relocate when the company moved.  My next book was Summer in Jar, which included jams as well as pickles.  That publishing company was bought out by a Christian publisher with no interest in cookbooks.  But I was off and running, writing  and editing cookbooks as a freelancer, writing for magazines, gardening, cooking, and raising a family.

Those first preserving books are out of print. The Pickled Pantry combines the very best of those original recipes with new ones.  Kimchi, anyone?

All along, through busy summers and leisurely ones, I had one quest: to make the perfect dill pickle.  Have I succeeded?  You be the judge. 


 A sample of No-Fail Half-Sour Dills

No-Fail Half-Sour Dill Pickles

Makes about 2 quarts


Vinegar gives a kick-start to the pickling process in these quick and easy pickles, guaranteeing success. If you’ve never tried fermented pickles, this is definitely the recipe to start with. You can multiply this recipe as many times as you like, but these pickles are best enjoyed at 1 to 2 weeks, so it makes sense to make small batches as the cucumber season progresses.


4 cups water

2 tablespoons pickling or fine sea salt

1/2 cup distilled white vinegar

1 dill head or 6 sprigs fresh dill

4 garlic cloves, peeled

8 cups whole pickling cucumbers


1. Heat the water and salt in a saucepan, stirring until the salt is fully dissolved. Add the white vinegar and let cool to room temperature.


2. Slice 1/16 inch off the blossom end of each cucumber.


3. Pack a clean 2-quart canning jar or crock with the dill, garlic, and cucumbers, in that order. Pour in the brine. Weight the cucumbers so they are completely submerged in the brine.


3. Cover the container to exclude the air. Set the jar where the temperature will remain constant: 65° to 75°F is ideal.


4. Check the jar daily and remove any scum that forms on the surface.


5. The pickles will be ready in 2 to 3 days, although full flavor will not be reached for a week. If your kitchen is reasonably cool, you can leave these pickles out for up to 2 weeks. If the brine starts to become cloudy, refrigerate immediately to prevent spoiling. The flavor of the dill and garlic will continue to develop. The pickles will keep for at least 3 months in the refrigerator.


Kitchen Note

If your cucumbers are large, you may want to cut them into spears rather than leave them whole. Spears will pickle faster and more evenly than whole cucumbers.


Adapted from The Pickled Pantry  by Andrea Chesman.  ©2012 Andrea Chesman.  All rights reserved.


Full of Beans


The seasons march on, but some foods stay the same.

Memorial Day Weekend marks the beginning of the summer dining season, if not the actual beginning of summer..  For some, this means picnic suppers. My summer begins when I can fire up the grill and start eating on a screened in porch with a view of the river.  I’d like to say that my summer begins with an early harvest, but the veggies are still tiny seedlings, the peas only 6 inches tall.

The garden is all potential now. My garden is all potential right now: a delivery of composted manure, a newly dug bed on a sunny slope, germinating beets, carrots, lettuce, and spinach.

What to eat on al fresco when you are still eating last year’s harvest?  Why baked beans, of course.  

Baked beans, hot dogs, cole slaw, pickles!

Baked beans are a picnic tradition in the Northeast.  They travel warm in a Dutch oven and can be made in advance or baked slowly underground in a bean hole. The bean hole is a well-established tradition in New England that may date back to Native Americans, who prepared beans seasoned with maple syrup, bits of venison, and bear grease.  They baked them in a pit dug into the ground. It is thought that early European settlers adopted the bean, which is a New World food, cooking it with molasses or maple syrup and salt pork. Beans baked in cast iron pots buried in the ground became a lumber camp specialty and remains popular in New England – and especially in Maine -- to this day, particularly for public suppers and community gatherings.

Vermont used to be a center of bean agriculture.  There were bean elevators north of Burlington in the same way that there are grain elevators in the Midwest.  Trains sent the beans to Montreal, Boston, and New York and returned with tourists, who even then enjoyed Vermont’s rustic charms. Then, during World War II, the government set bean prices at a low of $.85 a pound, to encourage meatless eating at a time when meat was rationed.  But there was no ceiling on milk prices, so Vermont farmers switched to more lucrative dairy.  Local bean growing is slowly returning as milk prices tank, but demand far exceeds supply.

Dried beans are a long-season crop.  They do best in the flatlands and valleys, not in my short-season, mountain-top garden.

For cooking baked beans, I prefer navy beans, though yellow-eyes, soldier beans, and Jacob’s cattle beans are popular choices around here. Navy beans soaked overnight. I don’t bother with a bean hole; a 300° oven does fine for me.  And what goes best with baked beans for a summer supper?  Why, hot dogs, of course.  And cole slaw.  Welcome to summer.  I’m feeling full of beans.

Sunday Supper Baked Beans
Makes 6 servings

The two-stage cooking process (beans are boiled, then baked) is necessary to achieve a perfect texture.  Once the bean comes in contact with the acidic flavorings (ketchup, coffee, and so on) the skins will soften no further, so they must be cooked to tenderness first. This is a fairly classic baked bean recipe, tweaked a little for greater depth of flavor.  In the vegetarian version below, chipotle chiles replace the bacon for a touch of smoke.

2 cups dried navy or pea beans, soaked overnight and drained
8 cups water
1 large onion, halved and thinly sliced
1/2 cup pure maple syrup or firmly packed brown sugar
1/2 cup ketchup
1/2 cup brewed coffee
2 tablespoons soy sauce
1 tablespoon prepared mustard
2 teaspoons powdered ginger
4 ounces thick-cut bacon, diced 

1. Combine the beans with the water in a large saucepan.  Cover and bring to a boil. Reduce the heat and simmer, partially covered, until just tender, 1 to 1 1/2 hours. Skim off any foam that rises to the top of the pot.

2. Transfer the beans and their cooking water to a bean pot or covered casserole. Add the onion, maple syrup, ketchup, coffee, soy sauce, mustard, ginger, and bacon and mix well.  

3. Cover and bake at 300° F (no need to preheat) for about 3 hours.  Check occasionally and add more hot water if needed to make sure the beans remain moist. On the other hand, if the beans seem too soupy remove the cover during the last 30 minutes. Serve hot.
Vegetarian Baked Beans.  Omit the bacon.  Add 2 tablespoons chopped chipotles in adobo sauce and proceed as above.

Adapted from Recipes from the Root Cellar by Andrea Chesman.  ©2010 Andrea Chesman.  All rights reserved.

Volunteers in the Garden

Easy Pumpkin CakeI’m not talking about getting the kids or the neighbors or friends to help with big chores, like digging new beds or erecting fences.  I’m talking about volunteers, spontaneous growth of unplanned and unplanted vegetables.


Some people call them weeds.


You don’t have to be particularly inexperienced or particularly soft-hearted to think that volunteers are a good thing.  I rarely have to plant dill or cilantro because it just pops up near wherever it grew the previous year.  Tomatoes often volunteer and because I plant heirlooms, they breed true.  Last year we had a generous harvest from a single volunteer tomatillo plant (which was something of a mystery because I’ve never grown tomatillos).


So last year when a volunteer winter squash popped up in a corner of the garden, we—my son and I—allowed it to spread across the lawn.  We couldn’t guess the variety until it had fruited, so against my better judgment, we let it grow.  I knew it was likely to be some ancient winter squash throwback, some variety whose genes were mixed into a hybrid variety for a single characteristic like color, or days to harvest, but not necessarily fine flavor. It certainly grew vigorously and fruited copiously.  


The harvested squash turned out to have no verifiable identity. It looked like a green pumpkin, with paler flesh.  “Can I compost it now?”   I asked throughout October and early November.  “No, no, don’t throw it out!  Cook it.”  Who throws away good food?  Not me.

Spaghetti squash and no-name squash/pumpkin harvest

I cooked the odd squash and found the flavor insipid but not bad.  The flesh was watery, perhaps by nature but perhaps because it had been such a wet growing season. Whatever it was, I put by several quarts in the freeze because I’m not the type to waste food.  I figured even weird, watery, no-name squash would be fine in this foolproof recipe for pumpkin cake


Now it is time to use up the old harvest to make way for the new.  And I still have several containers of this squash. 


This quick and easy recipe is perfect for using up pureed winter squash or pumpkin—frozen or canned, insipid or inspiring. I topped it with chopped pecans and sent it off to the refreshment table for the May Ripton Community Coffeehouse concert with Dollar General.  It was eaten and I heard no complaints—sugar fixes what nature doesn’t. 

Easy Pumpkin Cake

Serves 12 to 15

At my children’s elementary school, this recipe was passed from mother to mother and from class to class.  It was featured at the school’s annual Thanksgiving feast, a meal prepared by parents and school children and shared with all the school families and the town elders each year.  It has become the cake I am most likely to whip up when a bake sale or potluck dinner catches me unprepared.  And it is absolutely foolproof.


First I drained the squash puree so it would be less watery.

2 cups unbleached all-purpose flour

2 teaspoons baking powder

2 teaspoons ground cinnamon

1 teaspoon baking soda

1 teaspoon salt

1 1/2 cups sugar

1 cup canola oil

4 large eggs

1 3/4 cups cooked and mashed pumpkin or winter squash puree 

Cream Cheese Frosting

1 (8-ounce) package cream cheese, softened

1/2 cup butter, softened

1 teaspoon vanilla extract

2 to 2 1/2 cups confectioners’ sugar, sifted

1. Preheat the oven to 350° F.  Butter and flour a 9- by 13-inch baking pan.

2. In a medium-sized mixing bowl, combine the flour, baking powder, cinnamon baking soda, and salt.  Mix well.
 

3. In a large mixing bowl, combine the sugar and oil and beat until light.  Add the eggs, one at a time, beating well after each addition.  Beat in the pumpkin.  Add the flour mixture and beat just until thoroughly blended.  Pour the batter into the prepared pan.

4. Bake for 30 to 35 minutes, until the top springs back when lightly touched.

5. Cool completely on a rack.


6.  To make the frosting, beat together the cream cheese, butter, and vanilla.  Add 2 cups confectioners’ sugar and beat until smooth.  If the frosting is too thin, add the additional 1/2 cup confectioners’ sugar and beat until smooth.

7. Spread evenly over the cooled cake.


From Serving up the Harvest by Andrea Chesman.  © 2009 Andrea Chesman.  All Rights Reserved.


Borscht! Glorious Borscht

What’s not to love about borscht?  It is infinitely variable, infinitely delicious, and beautiful to behold.
Borscht There aren’t many soups that are equally delicious hot or cold, in simplified or embellished form.  
The strange thing about borscht is that kids hate it, and I don’t know why.  I hated it as a kid, my kids hated it when young.  The odd thing is, we all agree it tastes the same; it is just now we perceive it as delicious, as in, “When are you going to make borscht again?!?”
One of the great things about borscht is that it uses a root vegetable that has staying power in the root cellar (your’s or your friendly farmer).  So this time of year, before the local harvests (at least in the Northeast), there are still beets to enjoy.  Be aware, though, that some beets may look okay from the outside, but be funky within.Some of these beets are moldy on the inside and must be discarded  Therefore it is a good idea to buy more than you think you will need.
If it turns out that the weather is chilly on the day serve your soup, serve it hot.  If it turns out to be a dazzling, hot spring day such as we have had lately, then serve it chilled if you like—with or without the potato.  My family is split about the potato with a chilled soup.  The potato lovers say potato is always appropriate.  I’m more inclined to accompany a chilled version with buttered rye bread.  Glorious! 
 
Borscht

Serves 4


Getting ready to cook borscht.
4 medium to large beets (1 1/2 to 2 pounds)
1 onion
4 cups vegetable broth, chicken broth, beef broth, or water
4 thin-skinned potatoes
Juice of 1/2 lemon
Salt and freshly ground black pepper
Sour cream
Dried dill, to garnish
1.  Peel and grate the beets and onions.  A food processor makes lovely, uniform shreds, which greatly enhances the soup.Shredded beets. The onions quickly take on the color of the beets.
2.  Combine the beets, onions, and broth in a saucepan.  The broth should just barely cover the vegetables.  Add additional broth or water if needed.  Bring to a boil, cover, and reduce the heat to a simmer.  Simmer for 30 minutes.
3.  Meanwhile, put the potatoes in a saucepan, cover with water, and bring to a boil.  Boil gently for about 15 minutes, until the potatoes are tender, about 20 minutes.  Drain and keep warm.
4.  When the beets have simmered for 30 minutes, add the lemon juice and salt and pepper to taste.  Simmer for another 5 minutes, until the beets are fully tender and the flavors have blended.
5.  To serve, put a potato in each bowl. Break up the potato with a fork or potato masher, but do not mash.  Ladle the hot soup over the potato in each bowl and top with a dollop of sour cream.  Sprinkle dill over the sour cream and serve at once.
Adapted from Recipes from the Root Cellar by Andrea Chesman.  ©2010 Andrea Chesman.  All rights reserved.


Use It Up Season

Maple-Pear Tea Cake. Plate by Mar Harrison
Old accounts of life in Vermont—everywhere really—used to note that spring, before the new crops started to yield, was the “hunger season.”  Stores of food were mostly gone, with the exception, perhaps, of some limp root vegetables, sprouting potatoes, and rotting apples in the root cellar. 
These days, in North America at least, hunger is more likely to be a year-round consequence of an unequal economy and not diminished food stores.  Still, neither forest nor fields are offering up fresh local foods just yet.  For the thrifty homesteader and localvore, it is “use it up season,” time to make sure you have eaten all the fruits and vegetables, jams and pickles you have put by, to make room for this year’s harvests.
I have a tendency to save frozen berries for a “special treat.”  So they are one of the items that tends to linger in the freezer.  Not so with tray-frozen wild blueberries, which were eaten as a snack by the handful and gone before the first frost.  Canned pears is another item that tends to linger, perhaps because of my insistence on canning in “healthy” apple juice rather than a sweet sugar syrup.  Sprinkle it with sugar, I say, if that’s what you want!
This year’s maple syrup crop was meager at my house—only a couple of quarts.  But the yield from 2011 was so great that even though I gave away plenty as gifts, there is still more in the freezer.  So when it was time to bake a treat for the Ripton Community Coffeehouse concert this month, a Maple-Pear Tea Cake was the obvious choice.
Ingredients for Maple-Pear Tea Cake, including pears canned in apple juice
I'm no Marie Antoinette.  I know that cake has nothing to do with real, physical hunger.  But in this season, when we hunger for working in the garden and renewing our outdoor lives, a sweet treat is always welcome. 
Maple-Pear Tea Cake
Serves 8 to 12
The combination of maple syrup and pears is heavenly, and this cake proves it.  A pint of pears yields one loaf; a quart would yield a double batch.
2 1/2 cups unbleached all-purpose flour
1 tablespoon baking powder
1/2 teaspoon baking soda
1/4 teaspoons salt
2 large or 4 small pears, peeled (if fresh) and diced
3/4 cup pure maple syrup
1/4 cup firmly packed brown sugar
1/4 cup unsalted butter, melted
1 large egg, beaten 
1/2 cup sour cream or yogurt
1 teaspoon vanilla extract
1. Preheat the oven to 350° F.  Butter a 9 by 5-inch loaf pan.
2.  Sift together the flour, baking powder, baking soda, and salt.  Add the pears, tossing them to coat with the flour.
3.  Beat together the maple syrup, brown sugar, melted butter, egg, sour cream, and vanilla.  Stir in the dry ingredients. Spoon the batter into the prepared pan and smooth the top. 
4. Bake for 1 hour, or until a toothpick inserted into the center comes out clean and the cake has begins to pull away from the sides of the pan.
5.  Cool on a wire rack for 15 minutes.  Invert onto a wire rack and finish cooling.  
A very moist slice. Plate by Mar Harrison
From 250 Treasured Country Dessert.  © 2009 Andrea Chesman and Fran Raboff.  All Rights Reserved.


March Market Madness

The email arrived in my mailbox with the title “March Market Madness.”  My friend Lauren Slayton had a problem.  She is a market gardener, brilliant baker, and superb cook who sells baked goods, soups, and other prepared foods at the Middlebury Farmers’ Market.  Like many growers trying to earn a living off the land, she finds it necessary to market “value-added” products.  Carrots may be a dime a dozen in the growers’ bins, but Lauren’s creamy Carrot-Ginger Soup is a whole other story.  It flies out of the market.  Likewise her potpies and rustic tarts, not to mention her breads, brownies, and cookies.


Now that it is March, Lauren’s supply of the vegetables she grew herself has dwindled. So she proposed a contest to help her come up with a localvore-inspired recipe for the next market, with extra brownie points (literally, meaning she would include brownies with the prize), if the recipe included onions or garlic, her last remaining vegetables.


 Red onions. Photo by Lauren Slayton

Onions don’t get enough love.  They are a workhorse in the kitchen, the backbone flavor note in many, many soups and sauces.  I don’t think my mother ever cooked a single dinner than didn’t start with “first you sauté an onion.”  But beyond French onion soup and batter-coated onion rings, there aren’t a lot of classic onion dishes.  So Lauren’s market regulars might have been stumped by the challenge.  But I wasn’t.


Just that week, I watched as my last pint jar of Rosemary Onion Confit was opened and consumed on biscuits with some nicely aged goat cheese from Twig Farm in Cornwall, Vermont.  I knew that onions can be the star of the show, so I sent her a recipe that will appear in The Pickled Pantry, which will be out in June.  The recipe makes a delectable, savory-sweet jam or rosemary-scented caramelized onions.  I’ve enjoyed it on turkey sandwiches and used it to as a filling for a pork tenderloin.

 Rosemary Onion Confit on a biscuit

Lauren used the confit as a filling for a rustic tart.  What will this relish inspire you to make?


Photo by Lauren Slayton

Rosemary Onion Confit

Makes 3 pints

            . 

¼ cup extra virgin olive oil

3 pounds onions, chopped

3/4 cup sugar

1 cup cider vinegar

1 tablespoon rosemary

1 tablespoon soy sauce, or to taste

Freshly ground black pepper


1.  Heat the oil in a large saucepan over medium-high heat.  Add the onions, reduce the heat to low, and stir to coat the onions with the oil. Cook, stirring occasionally, until the onions are brown and meltingly tender, about 30 minutes.


2.  Stir in the sugar, cider vinegar, rosemary, and soy sauce and simmer for 5 minutes.


3.  Pack the onion mixture into clean hot pint jars, leaving ½ inch headspace.  Remove any air bubbles and seal.


4. Process for 10 minutes in a boiling water bath.  Let cool undisturbed for 12 hours.  Store in a cool dry place.  


Recipe from The Pickled Pantry by Andrea Chesman.  ©2012.  All rights reserved.