Recipes from the Root Cellar

Woodchuck Stew

The time has come

The gardener said

To post unpleasant blogs

Of does and bucks 

And slugs and flies

And ravenous groundhogs.


Groundhog AKA woodchuck AKA PEST!
I have experienced rage, pure murderous, blinding rage only once in my life.  It was provoked by a woodchuck.

This woodchuck, or ground hog as some would call it, could distinguish among the different sounds of various car motors and knew when a car pulled into the driveway whether it was one of the roommates who had a dog that would go after the woodchuck.  It also knew which car was driven by someone who would go after the woodchuck with a shovel.  And it knew the sound of my car.  When I pulled in, he would stand on his hind legs and laugh at me.  I swear it.

We tumbled rocks down the existing woodchuck holes.  We contemplated pouring gasoline down the holes and throwing in burning sticks of wood.  We contemplated dynamite.  The lettuce was gone.  The spinach was gone.  The broccoli was sorely nibbled.  

We built a fence around the garden.  We buried the chicken wire a foot deep in the hard clay soil and swore no woodchuck would breech our defenses. Two new woodchuck holes opened up—right in the middle of the corn patch.  

That’s when I experienced rage.  I did go after that woodchuck with a shovel.  But I never caught up to it.  There was always another hole for it to escape into.  Eventually, we both moved away.

My friend Jane is a woodchuck warrior of great skill and creativity. Jane lives in town, where woodchucks are particularly voracious and preys on backyard gardens.  These gardens are not large enough to share with critters, so she has gathered all the neighbors together and enlisted them as well.  

To begin with, Jane makes a woodchuck-hole sachet consisting four layers of 1-inch nylon netting (two layers are 3-feet square, the other layers are scraps.  They netting is wrapped around rocks that are bigger than grapefruits. The netting is gathered around the rocks to resemble a purse, or sachet.   She stuffs the netting sachet (she calls in a bon-bon) in each hole she finds.  Jane also lays that same netting around the perimeter of her garden in sheets that are 25 feet long and 6 feet wide; the woodchucks don't like to cross it. She installed a solar-powered sound emitter that repels woodchucks.  And she has electric fencing -- with one strand low enough to also deter rabbits. 

I asked Jane how much she has spent on her woodchuck war.  "Oh, I don't even want to guess," she said.


I don’t worry about woodchucks anymore.  My son has a .22 and he knows how to use it.  He is pretty firm in his conviction that you only kill what you eat, and I am firm in my conviction that I would rather eat a woodchuck than see one, so it all works out.

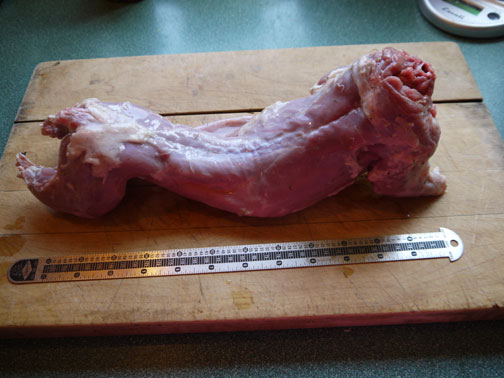
He looked huge but weighs only 2.14 pounds.
Woodchucks, for all their mass, don’t yield that much meat.  The woodchucks average around 2 pounds after all the fur and organs are discarded.  That 2-foot critter was mostly just voracious appetite and fur.  It should be noted that woodchucks, as well as most other small food animals such as squirrel, have scent glands that should be cut out as soon as possible to avoid tainting the meat. When dressing woodchucks, look for and carefully remove without damaging any small gray or reddish brown kernels of fat located under the forelegs, on top of the shoulder blades, along the spine in the small of the back, and around the anus.

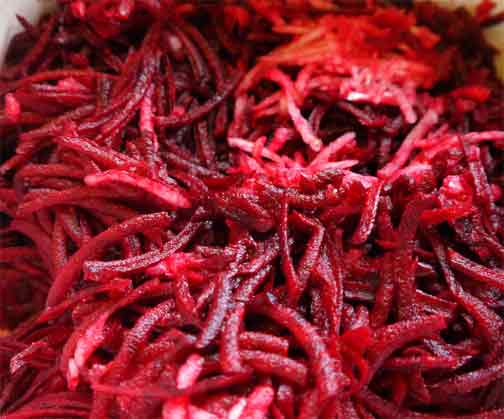
I have no family tradition to lean back on when it comes to cooking woodchuck, so I use my beef stew recipe.  Here I made it with the last of my root-cellared carrots and potatoes, but any root vegetables are in stew.  Also any meat.

The meat tastes more like squirrel or rabbit than anything else – they are all rodents, after all.  I did not weep to see the stew disappear.


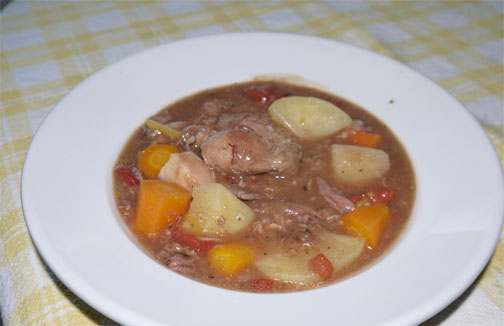
Mystery meat stew? No! It's woodchuck stew!


Woodchuck Stew 

Serves 4 to 6
This recipe is adapted from a beef stew recipe from Recipes from the Root Cellar.  A similar recipe appears in Serving up the Harvest.  

2 pounds woodchuck, cut into serving pieces

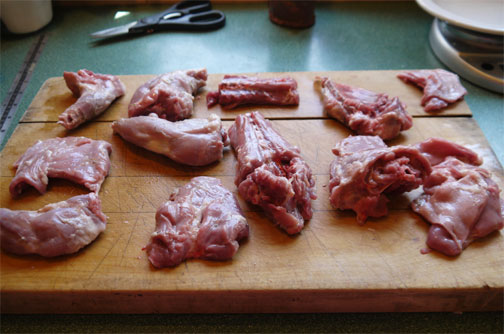
It's pretty obvious how to cut the critter up.

1/2 to 2/3 cup all-purpose unbleached flour

1 tablespoon dried thyme

1 teaspoon dried oregano

Salt and freshly ground black pepper

3 to 4 tablespoons extra virgin olive oil

1 large onion, thinly sliced

1 1/2 cups beef broth 

2 cups home-canned or store-bought diced tomatoes with juice

1 cup red wine

2 garlic cloves, minced

12 to 16 ounces rutabaga or turnips, peeled and cut into 1-inch cubes

12 to 16 ounces carrots, peeled cut into 1-inch cubes 

12 to 16 ounces parsnips, peeled and cut into 1-inch cubes

16 ounces thin-skinned potatoes, peeled and cut into 1-inch cubes

1. Pat the meat dry. Combine the flour, 1 teaspoon of the thyme, and oregano in a shallow bowl.  Season generously with salt and pepper.  Add the meat and toss to coat.

2. Heat 3 tablespoons of the oil over medium heat in a large saucepan or Dutch oven.  Lift the meat out of the flour, shaking off the excess, and add a single layer to the pot.  Do not crowd the pot.  Let the meat brown, turning as needed, about 5 minutes.  Remove the meat as it browns and set aside.  Continue cooking until all the meat is browned.

3.  Add the remaining 1 tablespoon oil and onion to the Dutch oven and sauté until the onion is soft, about 3 minutes.  Add the broth, tomatoes, wine,  garlic, and remaining 2 teaspoons thyme.  Stir to scrape up any stuck bits from the bottom of the pan.  Bring to a boil, then reduce the heat to a slow simmer.  Return the meat to the pan.  Partially cover the pan and let simmer until the meat is tender, 2 to 3 hours.

4.  Add the rutabagas, carrots, parsnips, and potatoes to the pan and let simmer until the vegetables are tender, about 1 hour.  

5.  Taste and add salt and pepper as needed.  Serve hot. 


Recipe adapted from Recipes from the Root Cellar by Andrea Chesman.  ©2010 Andrea Chesman.  All rights reserved.

Winter Salads II

Spring is coming


I know spring is coming because we have tapped the maple trees. 

and like most gardeners, I am dreaming of the garden season to come.  But in the harsh light of day, or rather the lengthening hours of soft afternoon light, I am contemplating what preserved foods need to be used up.  Not much as it turns out.


The last of the vegetables in the root cellar and what’s this?  Another bag of frozen green beans? And frozen peas?


My heart doesn’t soar looking at the last of the vegetables in cold storage, but I do crave green food – be it fresh or frozen. Turning not-fresh vegetables into salads will be the challenge of the day.

 Roasted Vegetable Salad with Maple-Soy Vinaigrette

When I was working my way through college, I briefly held a job in the kitchen of an assisted living residence.  My boss—the meal planner—was old enough to be a resident herself, and salads tended to be easy on dentures – a scoop of cottage cheese garnished with canned peach slices or a square of lime jello in which shredded carrots were suspended, topped with a dollop of mayo.  All served on a limp leaf of iceberg lettuce. Yum. 


But there was one salad I liked (minus the iceberg): frozen peas, sour cream, and dried dill or dill seed.  I like it still, and it makes a fine salad for this time of year.

 A simple salad of just three ingredients: frozen peas, sour cream, and dill seeds. And, of course, salt and pepper.

What else? Frozen green beans will make a fine salad with canned white beans and the last of the pickled roasted peppers.  Sure, it is close to the original three-bean salad made with canned green beans, canned wax beans, and canned kidney beans in an overly sweet dressing.  But this iteration makes really fine use of frozen green beans (or wax beans, if you have them).  I am sure it will add to everyone’s enjoyment to know that this salad, which dates back to the 1800s, was J. Edgar Hoover’s favorite salad and believed to be one of the final dishes he ate before his death.

 Two bean salad. Choose any vinaigrette to dress this.

The last few turnips, carrots, and beets in the root cellar are a little soft, and here and there are browned, decay spots.  Not a problem—I’ll just cut them away.  The vegetables will be fine roasted.  They will be even tastier tossed with a maple-soy vinaigrette and bedded on some winter greens.  That maple-soy vinaigrette makes every vegetable delicious.  The combination of the umami characteristics of soy sauce matched with the sweetness of maple syrup and rounded out with balsamic vinegar—I don’t think I have a finer salad dressing in my repertoire…


Roasted Vegetable Salad

Serves 4


1 large beet, peeled and diced

2 carrots, peeled and diced

1 parsnip, peeled and diced

1 rutabaga, peeled and diced

1 whole garlic head, cloves separated and peeled

2 tablespoons extra virgin olive oil

4 to 6 cups mixed tender winter greens (Belgian endive, escarole, frisée, napa cabbage, or Savoy cabbage), thinly sliced

Maple-Soy Vinaigrette (recipe follows)

Salt and freshly ground black pepper


1. Preheat the oven to 450° F.   Lightly oil a large shallow roasting pan or half sheet pan.

2.  In a large bowl, combine the beet, carrots, parsnip, rutabaga, and garlic. Add the oil and toss well.  Transfer to the pan and arrange in a shallow (preferably single) layer.  

3. Roast the vegetables for 35 to 40 minutes, until the vegetables are tender and lightly browned, stirring or shaking the pan occasionally for even cooking. 

4. Just before serving, on a large platter, toss the greens with about 1/4 cup of the vinaigrette. Arrange the vegetables on top and drizzle with another 1/4 cup of the remaining dressing and toss again. Season to taste with salt and pepper. Serve at once, passing the remaining vinaigrette at the table. 


Recipe adapted from Recipes from the Root Cellar by Andrea Chesman.  ©2010 Andrea Chesman.  All rights reserved.


Maple-Soy Vinaigrette

About 2/3 cup


2 tablespoons balsamic vinegar

2 tablespoons soy sauce

2 tablespoons pure maple syrup

2 garlic cloves, minced

1/2-inch ginger, peeled and minced

3 tablespoons extra virgin olive oil


Whisk together the vinegar, soy sauce, maple syrup, garlic, and ginger until combined. Whisking constantly, drizzle in the oil until the mixture emulsifies. Serve immediately or store in the refrigerator in an airtight container for up to 1 week.


Recipe from Recipes from the Root Cellar by Andrea Chesman.  ©2010 Andrea Chesman.  All rights reserved.


Borscht! Glorious Borscht

What’s not to love about borscht?  It is infinitely variable, infinitely delicious, and beautiful to behold.
Borscht There aren’t many soups that are equally delicious hot or cold, in simplified or embellished form.  
The strange thing about borscht is that kids hate it, and I don’t know why.  I hated it as a kid, my kids hated it when young.  The odd thing is, we all agree it tastes the same; it is just now we perceive it as delicious, as in, “When are you going to make borscht again?!?”
One of the great things about borscht is that it uses a root vegetable that has staying power in the root cellar (your’s or your friendly farmer).  So this time of year, before the local harvests (at least in the Northeast), there are still beets to enjoy.  Be aware, though, that some beets may look okay from the outside, but be funky within.Some of these beets are moldy on the inside and must be discarded  Therefore it is a good idea to buy more than you think you will need.
If it turns out that the weather is chilly on the day serve your soup, serve it hot.  If it turns out to be a dazzling, hot spring day such as we have had lately, then serve it chilled if you like—with or without the potato.  My family is split about the potato with a chilled soup.  The potato lovers say potato is always appropriate.  I’m more inclined to accompany a chilled version with buttered rye bread.  Glorious! 
 
Borscht

Serves 4


Getting ready to cook borscht.
4 medium to large beets (1 1/2 to 2 pounds)
1 onion
4 cups vegetable broth, chicken broth, beef broth, or water
4 thin-skinned potatoes
Juice of 1/2 lemon
Salt and freshly ground black pepper
Sour cream
Dried dill, to garnish
1.  Peel and grate the beets and onions.  A food processor makes lovely, uniform shreds, which greatly enhances the soup.Shredded beets. The onions quickly take on the color of the beets.
2.  Combine the beets, onions, and broth in a saucepan.  The broth should just barely cover the vegetables.  Add additional broth or water if needed.  Bring to a boil, cover, and reduce the heat to a simmer.  Simmer for 30 minutes.
3.  Meanwhile, put the potatoes in a saucepan, cover with water, and bring to a boil.  Boil gently for about 15 minutes, until the potatoes are tender, about 20 minutes.  Drain and keep warm.
4.  When the beets have simmered for 30 minutes, add the lemon juice and salt and pepper to taste.  Simmer for another 5 minutes, until the beets are fully tender and the flavors have blended.
5.  To serve, put a potato in each bowl. Break up the potato with a fork or potato masher, but do not mash.  Ladle the hot soup over the potato in each bowl and top with a dollop of sour cream.  Sprinkle dill over the sour cream and serve at once.
Adapted from Recipes from the Root Cellar by Andrea Chesman.  ©2010 Andrea Chesman.  All rights reserved.


Roasted Chicken with Root Vegetables

Is it winter or spring?   The wacky weather we have been having says spring, and the snows have melted unusually early this year.  But spring has not sprung.  Not yet.  There are still root vegetables filling the root cellar and produce bins at the stores.  Not even the wild leeks have begun to emerge from the forest floors.  We have been making maple syrup all week, so no, it is not spring.
Roasted chicken makes a festive dish any time of the year.  Root vegetables added to the roasting pan makes a one-dish meal that is hard to beat. My stovetop is engaged with boiling sap for syrup, so a one-dish meal in the oven is good thing.
 
In this dish I have golden beets, fingerling potatoes, onion, carrots, celery root, and garlic.  The veggies take on the flavor from the chicken juices – a delightful combination.  A fresh cabbage salad would not go amiss here.  Serve with a good red wine and you won’t mind waiting just a bit longer for spring.
Roasted Chicken with Root Vegetables

Serves 4 to 6
1 whole roasting chicken (3 1/2 to 5 pounds), neck and giblets removed
2 tablespoons canola or extra virgin olive oil 
6 cups peeled and cubed root vegetables (any combination of beets, carrots, celery root, parsnips, rutabagas, salsify, turnips) 
2 cups cubed fingerling potatoes
1 to 2 onions, cut into wedges
1 whole bulb garlic, cloves separated and peeled
2 tablespoons extra virgin olive oil, plus more to brush
3 teaspoons dried sage
1.  Preheat the oven to 350°F.
2.  Rinse the chicken under cold running water and pat dry.  Set in a large roasting pan.  (The pan must be large enough to hold the vegetables in a single layer surrounding the chicken.)  If you like, tie together the legs with cotton string or thread to prevent them from overcooking.  Brush with the oil and sprinkle with 1 teaspoon of the sage.
3.  In a large bowl, combine the root vegetables, potatoes, and onions in a large bowl.  Place a few garlic cloves and 1 teaspoon of the sage in the chicken.  Add the remaining garlic cloves to the vegetables along with the remaining 1 teaspoon sage.  Add the oil, salt and pepper, and toss to coat. Arrange the vegetables in a single layer around the chicken. 
4.  Roast for 1 1/2 to 2 hours (20 to 25 minutes per pound), until the juices run clear from the chicken, a leg moves easily, and an instant-read thermometer inserted into the thickest part of the thigh reads 165°F.  Stir the vegetables once or twice during the roasting to promote even roasting and baste the vegetables with the yummy chicken juices.
5.  Transfer the chicken and vegetables to a serving platter and keep warm under a tent of foil.  Allow to rest for 10 minutes before serving. 
Adapted from Recipes from the Root Cellar.  ©2010 Andrea Chesman.  All rights reserved


Music and Noodles

When you live in a DIY world, music can be as much a part of your life as carpentry and dinner from food you raised yourself.

It was around my dinner table—I can’t remember the menu at this point—that a casual conversation about the dearth of venues for singer-songwriters morphed into the idea of starting a once-a-month coffeehouse series.  Eighteen years later, the Ripton Community Coffee House is still going strong.

There’s a dedicated volunteer crew to keep the organization going.  I feed the performers and crew who come early for set-up.  I got that job because I live closest to the venue, and not because I am a cookbook writer.  The musicians expect dinner made by the executive director’s wife.  Expectations are low.

My expectations are high, however, and I like to please.  Still, the menu can be a problem.  Inevitably there is a vegetarian in the group. Vocalists want to eat lightly and never want cheese before they sing.  Male instrumentalists eat hearty, the younger the heartier.

The dishes I choose must be ready by sound check time for the crew, but hold up for the sound man and the performers, who will eat a bit later.  The meal must be portable, because half will be served at the venue and half at my house, where the performers can relax. 

Lately, my go-to meal is Chinese sesame noodles, accompanied by Sweet Spicy Thai Slaw.  Sometimes I’ll roast some tofu to add protein.  The great thing about Sesame Noodles is that it can be adapted to what is in season and what is in the fridge.  In this week’s version, I swapped in a handful of chopped cilantro for the leek.  Scallions can replace leeks; cilantro is always a good addition.  During the gardening season, summer vegetables replace the carrots and daikon radish. 

In a DIY world, musicians should always eat free (see my favorite DIY blog, Cold Antler Farm.com) and recipes should be freely adapted.

Sesame Noodle Salad
Serves 4 to 6

 An arsenal of Chinese condiments combines to make the spicy dressing for these noodles.  Serve as soon as you combine the noodles and dressing.  If you want to make this dish ahead, cook the noodles and toss with sesame oil, assemble the vegetables, and make the dressing.  Refrigerate separately and combine just before serving.


1 pound dried vermicelli
1 leek, very thinly sliced
3 tablespoons Asian sesame oil
2 garlic cloves, chopped
1/2 inch fresh ginger, peeled and chopped
1/4 cup tahini
1/4 cup water
3 tablespoons soy sauce, or more to taste
1 tablespoon rice vinegar, or to taste
1 tablespoon Chinese black vinegar
1 tablespoon rice wine
1 to 2 teaspoons Chinese chili paste with garlic, or more to taste
2 tablespoons sugar, or more to taste
1 carrot, finely julienned
2 turnips or 6-inch piece daikon radish, peeled and finely julienned

 1.  Cook the noodles in plenty of boiling salted water according the package directions until tender but firm to the bite. 
2.  Place the leek in the colander.  Reserve 1 cup of the cooking water. Drain the noodles by pouring into the colander; the hot water will cook the leek.  Rinse with cold water.  Transfer the noodles and leek into a large bowl and toss with 2 tablespoons of the sesame oil.
 3.  In a blender, combine the garlic and ginger and process until finely chopped.  Add the remaining 1 tablespoon sesame oil, tahini, water, soy sauce, rice vinegar, black vinegar, 1 teaspoon chili paste, and sugar.  Blend well.  Dip a noodle into the sauce to taste for seasoning, and add more soy sauce, rice vinegar, sugar, or chili paste, as needed. 
 4.  Toss the noodles with the carrot and turnips. (If you can’t serve immediately, cover and refrigerate the noodle mixture.  Hold the dressing at room temperature for up to 4 hours. Just before serving, add the dressing to the noodles and toss well.  Taste and adjust the seasoning as needed. Serve immediately. 

Recipe from Recipes from the Root Cellar by Andrea Chesman. ©2010.  All rights reserved


Roasted Spiced Potatoes

      The story goes that at age two, still in the highchair, I declared to my mother that I would never eat potatoes again.  And I didn’t.  Not until I was a teenager and decided to try a French-fry.  Delicious.  Of course.

      My repertoire has expanded somewhat, though I am still not the potato eater the men in my family are.  RR has it in his Irish genes.  My boys are part Irish and part, well, I say that the genes on my side are from Russian potato farmers.  Something has to explain the sturdy looking legs.  In any case, I could serve them potatoes day in and day out to no complaints.

      This was the first year I grew potatoes myself.  I’ve always left it to the professionals before.  But Sam did the digging and planting, so I agreed to do the cooking.  We shared the joy of harvesting.  And it was pure pleasure, rooting around for every last spud.  We had planted a 5-pound sampler of fingerlings from Moose Tubers that included Austrian Crescent, French Fingerling, LaRatte, and Rose Finn Apple.  Although a pain in the neck to scrub, these small potatoes are delicious roasted.


      I play around with spices when I roast.  Sometimes I make my own spice mix, sometimes I pull a jar of Ethiopian berbere off the shelf.  It is all delicious.  Just give those babies plenty of room on a baking sheet.  If you want them to brown, don’t crowd them.  Slick them with oil, then spices, then roast in a hot oven, turning them once or twice.  That’s all there is to it.

      Here’s my recipe for Roasted Spiced Potatoes.  It serves four.


4 tablespoons canola oil

1 teaspoon salt

1 teaspoon curry powder

1 teaspoon onion powder

1 teaspoon ground cumin

1/4 teaspoon ground ginger

1/4 teaspoon Chinese five-spice powder

1/4 teaspoon freshly ground black pepper

1/8 teaspoon ground cayenne pepper

2 pounds thin-skinned potatoes, cut into 1-inch cubes


      1.  Preheat the oven to 425° F.  Lightly oil a large shallow roasting pan or half sheet pan.

      2.  In a large bowl, combine the oil with the salt, curry powder, cumin, five-spice powder, ginger, black pepper, and cayenne. Mix well.  Add the potatoes and toss to coat.  Spread the potatoes on the prepared pan in a single layer.

      4.  Roast for 35 to 40 minutes, turning occasionally for even cooking, until the potatoes are tender when pierced with a fork and browned.  Serve hot.


From Recipes from the Root Cellar. © Andrea Chesman.  All rights reserved.


Can't Cook Enough Kale!

Can’t Cook Enough Kale!

That was the title of a workshop I recently gave at the Mother Earth News fair in Seven Springs.  I am still catching off from my time there, when I promised to post recipes I prepared at the demo.  At last, I am fulfilling that promise. Below is the stir-fried greens I prepared for that demo.  I am also posting recipes for a salad and for shredded sautéed winter vegetables – two recipes I prepared for a workshop on Cooking Winter Vegetables.

 Kale is still growing.

      I am behind in every aspect of my life – in part because I have been busy trying to put my garden to bed.  Not a minute too soon, because the snow came this weekend.  Putting the vegetable garden to bed was a fairly easy task, because the soil is so lovely and yielding.  I planted a nice big bed of garlic and mulched the salsify, which I won’t harvest until the spring.


  Garden writers can wax poetic about time and worries slipping away in the Zen of gardening.  Not me, I was caught up in a sweaty profane battle against bishop’s weed in my perennial bed.  Bishop’s weed spreads by underground runners, and I suspect in a battle for territory against mint, the bishop’s weed would prevail.  It arrived unannounced and unwanted, probably in a perennial I purchased or was give by a “friend.”  Trying to get rid of it required digging up every square inch of garden and then sifting through the soil to remove even the smallest piece of root that remained.  I have no illusions that I succeeded in eradicating that pest, but I do think I made serious headway.  And along the way, I separated the iris and daylilies, which were in need of attention.

      Quite honestly, I’d rather be cooking.


Sichuan-Style Stir-Fried Chinese Greens

This has a few exotic ingredients, because I wanted to keep this vegetarian and I wanted to make something you might not have already tasted.  The odd ingredients are: Sichuan peppercorns and Chinese black vinegar.  Sichuan peppercorns are actually the berry of the prickly-ash and can be found at Asian groceries, perhaps under the name anise pepper, Chinese pepper, fagara, flower pepper, or sansho.  Chinese black vinegar has a distinctive flavor, closer to balsamic vinegar than to regular rice vinegar.  To make a reasonable substitute for Chinese black vinegar, mix 1 part soy sauce, 1 part Worcestershire sauce, and 1 part rice vinegar.


4 small dried chiles

2 teaspoons Sichuan peppercorns

2 garlic cloves, minced

1 1/2 pounds napa cabbage, bok choy, Chinese broccoli, kale, or other Chinese greens or a mix of greens, trimmed and sliced 1 inch thick, tough stems discarded

1/2 teaspoon sugar

1 tablespoon Asian sesame oil

Salt

Chinese black vinegar

      1.  Chop 1 ½ pounds kale or other greens

      1.  Heat 2 tablespoons in a large wok over high heat.  Add the 4 small chiles, 2 teaspoons Sichuan peppercorns, and 2 minced garlic and sauté for 30 seconds, just until fragrant.  Add the greens and stir-fry for 3 minutes, until the greens are wilted.  Cover and let steam until tender, 1 to 3 minutes, depending on the green and your preferences.

      2.  Add the ½ teaspoon sugar, 1 tablespoon sesame oil, and salt to taste.  Toss to mix.  Drizzle with the vinegar and serve immediately.


From Recipes from the Root Cellar by Andrea Chesman. ©2010.  All rights reserved.


Thai Sweet-Spicy Cabbage Salad

Serves 6 to 8

      This cabbage salad uses regular green cabbage, but napa cabbage could be substituted.  The secret ingredient is Thai sweet chili sauce, a condiment found in Asian markets.  It is made of sugar, vinegar, and chiles and makes a wonderful dressing for salads or a dip for spring rolls.  This salad combined with chicken makes a delicious wrap.


1 small head (about 1 1/2 pounds) green cabbage, cored and very finely sliced

2 teaspoons salt

1 carrot, grated

1/2 cup Thai sweet chili sauce

1/2 cup chopped roasted salted peanuts


      1.  Combine the cabbage and salt in a colander and toss to mix.  Let stand for about an hour to wilt the cabbage.

      2.  Taste the cabbage.  If it is too salty, rinse with cold running water.  Then drain.  Combine the cabbage, carrot, and chili sauce in a large bowl and toss to mix.  Add the peanuts and toss to mix.

      3.  Let stand for 30 minutes to allow the flavors to blend before serving. 


From Recipes from the Root Cellar by Andrea Chesman. ©2010.  All rights reserved.


Sautéed Shredded Root Vegetables

Serves 4 to 6

      This sauté of vegetables takes 10 minutes to cook and looks as beautiful on the plate as it is delicious to eat.  Vary the seasonings if you like, the shredded vegetables are amenable to experimentation.


3 tablespoons sunflower or canola oil

4 cups peeled and shredded mixed root vegetables (beets, carrots, celery root, parsnips, rutabagas, salsify, and /or turnips)

1 leek, trimmed and thinly sliced

4 garlic cloves, minced

½-inch piece fresh ginger, peeled and minced

1/4 cup dry white wine

Salt and freshly ground black pepper

Freshly grated nutmeg


      1.  Heat the oil in a large skillet over medium heat.  Add the root vegetables, leek, and garlic and sauté until the vegetables are limp, about 5 minutes.  Add the wine, cover, and cook until the vegetables are tender, about 5 more minutes.    

      2.  Season to taste with salt, pepper, and nutmeg.  Serve hot. 


From Recipes from the Root Cellar by Andrea Chesman. ©2010.  All rights reserved.